Cooking

Cooking at home can be quick and easy!
Learning just a few basics can get you off to a great start. With just a little practice, you will soon be a whiz in the kitchen! And your kids and other family members can help, too!
Cooking at home helps you to:
- Save money.
- Have more control over what your family eats.
- Limit the salt, sugar, and fat in your food.
- Cook the foods your family likes best.
- Spend fun, quality time with your family.
- Live happier and healthier!
Cooking

Know the lingo!
Knowing a few new terms can help you better understand recipes and be more comfortable cooking. Here are some of the most common words you will find.
- Bake: cooking in the oven.
- Usually used to describe the way you cook breads, cakes, cookies, and similar foods.
- Braise: a way to make tough cuts of meat more tender.
- First, brown the meat in a skillet on the stove.
- Then add a small amount of liquid, and cover the skillet with a lid or aluminum foil.
- Cook using low heat, in the oven, or in a slow cooker with a lid, until the meat is tender.
- Boil: cooking a liquid on the stove, or cooking something in a liquid, until many large bubbles quickly and continuously appear all over the surface.
- Caramelize: The process of "sautéing" (see below) a meat, fruit, or vegetable until their natural sugar begins to brown.
- Allow an item to sit undisturbed in a saute pan to speed up the caramelization process.
- Stir only occasionally, without allowing food item to burn.
- Chop: cutting into pieces.
- Cream: stirring or mixing ingredients fast and hard, by hand or with an electric mixer, until they are soft and creamy.
- You may see this in a recipe for a cake or cookies, which will say to cream the butter and sugar together.
- Dice: cutting into small cubes, about ¼ to ½ inch in size.
- Mince: cutting into tiny pieces, even smaller than dicing.
- Poach: gently cooking on the stove in a liquid like water, milk, wine, or stock (not oil).
- The liquid should not be hot enough to boil.
- Roast: cooking uncovered in the oven.
- Usually used to describe the way you cook meat and vegetables.
- Sauté: cooking in a small amount of oil or butter on the stove on medium to high heat, stirring often.
- Simmer: cooking in a liquid just below boiling point on the stove, usually over low or medium-low heat.
- Small bubbles appear in the liquid, but they don’t appear as quickly or continuously as in boiling.
- Stir-fry: cooking ingredients in a small amount of oil on the stove over high heat.
- The ingredients are usually cut all the same size so they cook quickly and evenly.
- You stir-fry by lifting and turning ingredients with a spoon or spatula during the stir-fry process.
- Whip: stirring or mixing ingredients together fast and hard, until they are light and fluffy.
- You can do this with a fork, a whisk, or an electric mixer.
Add Healthy Flavor with Herbs and Spices!

Add healthy flavor with herbs and spices!
You can keep foods flavorful and healthy, too!
Using spices and herbs to season foods can make them tasty, without adding fat, salt, and sugar.
Buying
Herbs are the leaves of a plant, and spices are made from the roots, bark, berries, and seeds of a plant.
You can buy herbs fresh or dried. Dried herbs can also be crumbled or ground. You can find fresh herbs in the produce or salad section of your grocery store. You can find dried herbs in the spice aisle. Generally, you can use either fresh or dried, whatever you have on hand.
You can buy spices ground or in a cracked, crushed, or flaked form. You can find spices in the baking needs or spice aisle in your grocery store.
Citrus juices, like lemon juice or orange juice, and vinegar also add a lot of healthy flavor. They aren’t really herbs or spices, but they are tasty!
Measuring
Generally, dried herbs have a much stronger flavor than fresh ones. Here is how to convert measurements from one form to the other.
- 1 Tablespoon of finely cut fresh herbs equals
- 1 teaspoon of crumbled dried herbs equals
- ¼ to ½ teaspoon ground dried herbs
Cooking
When you are cooking, start with ¼ teaspoon of ground spices or ground dried herbs for about four servings of food, 1 pound of meat, or 2 cups of soup or sauce.
Adjust as needed for the flavor level you want. Add just a little at a time. Remember, you can always put more in, but you can’t take it out!
If you are using crumbled dried herbs or fresh herbs, use more.
Red pepper and garlic powder
Start with 1/8 teaspoon for cayenne pepper and other hot peppers and for garlic powder. Adjust as needed for the flavor you want.
Remember that the flavor of red pepper becomes more intense as it cooks.
Doubling a recipe
If you are doubling a recipe, do not double the herbs and spices. Increase those amounts by 1 ½ times. Then adjust as needed for the flavor you want.
Using fresh herbs
If you are using fresh herbs, add them near the end of cooking or just before you serve the food. Cooking fresh herbs too long can reduce their flavor.
Add delicate fresh herbs just a minute or two before the food is done. Or sprinkle them over the cooked food before you serve it. Delicate fresh herbs are basil, chives, cilantro, and dill leaves.
Add sturdier fresh herbs about 20 minutes before the food is done. Sturdier fresh herbs are dill seeds, rosemary, tarragon, and thyme.
Here are some tasty flavors to try with your favorite foods! You can try just one, or make your own blend of spices you like.
Meat, Chicken, and Fish
Beef
Bay leaf, garlic, marjoram, nutmeg, onion, pepper, sage, thyme
Chicken
Garlic, ginger, lemon juice, marjoram, oregano, paprika, pepper, poultry seasoning, rosemary, sage, tarragon, thyme
Fish
Curry powder, dill, dry mustard, garlic, lemon juice, marjoram, paprika, pepper
Lamb
Curry powder, garlic, rosemary, mint
Pork
Garlic, onion, sage, paprika, pepper, oregano
Veal
Bay leaf, curry powder, ginger, marjoram, oregano
Vegetables
Carrots
Cinnamon, cloves, marjoram, nutmeg, rosemary, sage
Corn
Cumin, curry powder, onion, paprika, parsley
Green beans
Curry powder, dill, garlic, lemon juice, marjoram, oregano, tarragon, thyme
Greens
Garlic, onion, pepper
Peas
Ginger, marjoram, onion, parsley, sage
Potatoes
Dill, garlic, onion, paprika, parsley, sage
Summer squash
Cloves, curry powder, garlic, marjoram, nutmeg, rosemary, sage
Winter squash
Cinnamon, garlic, ginger, nutmeg, onion
Tomatoes
Basil, bay leaf, dill, garlic, marjoram, onion, oregano, parsley, pepper
Slow Cooker Meals for the Family

Slow Cooker Meals for the Family
Between work, school, kids, and many other things, it might seem impossible to come home at night and make a delicious family meal. But it is possible! A slow cooker is the perfect tool for busy people with busy schedules. A slow cooker allows you to prepare ingredients very quickly and leave them to cook themselves.
Why Use a Slow Cooker?
- Making meals in a slow cooker at home is cheaper and more nutritious than going out to eat.
- Meal prep is very fast, and clean-up is, too! Most slow cooker recipes only require ingredients to be chopped (if even that!).
- Slow cookers are useful year-round. In the summer, they don’t heat the house like the oven does. In the winter, they are perfect for making soups and stews to chase away the chill.
- Slow cookers are perfect for tenderizing inexpensive cuts of meat.
- Almost anything can be made in a slow cooker, including main dishes, sides, and desserts.
- You use less electricity cooking in a slow cooker than you do while using an oven.
About Slow Cookers
Slow cookers usually have two or three settings. A low heat setting requires a cooking time of between 6 and 8 hours. A high heat setting requires between 4 and 6 hours. One hour in the oven at 350 degrees is the same as 4 hours on high and 8 hours on low.
Slow cookers come in many sizes. Small slow cookers (about 1–3 quarts) are perfect for dips, while larger slow cookers are great for large pieces of meat. Slow cookers that are between 3 and 5 quarts are big enough to feed four people. If you have a family larger than four or you want leftovers, a slow cooker that is between 5 and 7 quarts is best.
Tips and Safety
If you are concerned about leaving the slow cooker on while you are not home, you can find different times to prepare the food, even overnight. After the food is done, make sure to cool down leftovers and store them in the refrigerator.
Here are some basic tips and safety guidelines:
- To make clean-up easy, use a slow cooker liner or grease the inside of the slow cooker with nonstick cooking spray or oil.
- Allow frozen meat to thaw in the fridge before putting it in a slow cooker or it will not cook thoroughly.
- Do not over fill or under fill a slow cooker; this will cause improper cooking. Always fill a slow cooker no less than halfway but no more than three-fourths of the way full.
- Most vegetables take longer to cook than meats. Vegetables should be layered at the bottom of the slow cooker with meat or poultry on top of them. Top the mixture with water, broth, or sauce.
- Liquids do not boil away in a slow cooker. If you are converting a recipe from one cooked in the oven to one cooked in a slow cooker, reduce the liquids by one-third to one-half.
- If possible, start your slow cooker on high for about an hour, and then change it to your desired temperature.
- No matter how tempting, do not lift the lid while cooking. Every time the lid is lifted, about 15 minutes of cooking time is lost.
- Add pasta and grains at the very end of the cooking time. They become mushy if they are left in too long. It may be best to cook them separately and add them after the slow cooker has finished cooking the rest of the meal.
- Dairy (milk, cheese, or cream) should be added in the last hour so they won’t curdle.
- Soft or quick-cooking vegetables—including zucchini, mushrooms, and peas—should be added during the last 45 minutes of cooking time.
Easy, Healthy Ways to Cook Your Veggies!

Easy, healthy ways to cook your veggies!
- Wash your vegetables under cool, running water before cooking and eating them. Gently scrub off any dirt you can see. Do not use soap.
- Keep fresh vegetables separate from raw meat or chicken.
- After cooking your vegetables, put any leftovers in the refrigerator within 2 hours.
Baking
Baking is an easy, no-fuss, no-muss way to cook vegetables. Baking is good for cauliflower, potatoes, sweet potatoes, and winter squash.
- Preheat your oven to 350 degrees. For potatoes and sweet potatoes, preheat oven to 425 degrees.
- Put the vegetables into the oven. Do not cover them.
- Cook until the vegetables are tender.
Grilling
Grilling adds crispiness and smoky flavor to vegetables. Grilling is good for asparagus, corn on the cob, eggplant, and zucchini.
- Put a large sheet of aluminum foil on the counter.
- Spread the vegetables onto the foil.
- Sprinkle olive oil and pepper over the vegetables. Mix them with your hands until all the vegetables are coated.
- Fold the aluminum foil to make a sealed packet.
- Cook on the grill until the vegetables are tender.
Microwaving
Microwaving cooks vegetables very quickly. Microwaving is good for beets, broccoli, and peas.
- Put the vegetables into a bowl that can go in the microwave, adding a little water into the bowl.
- Cover the bowl with its lid or a paper towel, to let steam escape.
- Cook the vegetables in the microwave until they are tender. Stir once or twice while they cook.
- Be careful when you remove the lid from the bowl. The steam can burn you!
Roasting
Roasting in the oven brings out the sweetness in the vegetables. Roasting is good for Brussels sprouts, carrots, parsnips, potatoes, sweet potatoes, squash, and zucchini.
- Preheat your oven to 400 degrees.
- Cut the vegetables into cubes. Try to keep them all about the same size.
- Spread the vegetables onto a large baking sheet. Sprinkle olive oil and pepper over them.
- Mix them gently with your hands until all the vegetables are covered with the oil and salt and pepper. Alternatively, you may mix the vegetables in a large, plastic storage bag. Spread them out again into an even layer.
- Cook in the oven until the vegetables are tender.
Steaming
Steaming in just a little water keeps vitamins inside the vegetables. Steaming is good for corn on the cob, green beans, and spinach.
- Put the vegetables in a shallow pan, with 1 to 1 ½ inches of water in the bottom.
- Put a lid on the pan, or cover it tightly with aluminum foil.
- Cook on the stove over medium-low heat. Keep the water bubbling gently.
- Cook just until the vegetables are tender.
Stir-frying
Stir-frying cooks the vegetables quickly. Stir-frying is good for bell peppers, mushrooms, and snow peas.
- Cut the vegetables into thin slices.
- Put the vegetables into a large skillet with just 1 or 2 tablespoons of vegetable oil.
- Cook them on the stove over medium-high heat. Stir them the whole time they are cooking.
Cook until the vegetables start to get tender.
Measuring

Measure up!
Measuring carefully and using the right tools can make cooking much easier. Your meals will turn out better, too!
Don't guess or "eyeball" measurements
If you are new to cooking or if you are using a new recipe. Even if you’re an experienced cook, never estimate measurements when you’re baking.
Use the right tools
Coffee cups, tea cups, and the spoons you eat with are not good for measuring when you are cooking or baking. These items are not consistent in size or volume and can cause you to add too much or too little of an ingredient. Use actual measuring cups and measuring spoons. A well-stocked kitchen will have a liquid measuring cup, a set of dry measuring cups, and a set of measuring spoons.
Use the tool that lets you make the fewest measurements possible.
For example, if you try to measure 2 cups of flour with a ¼-cup scoop, you will have to measure out 8 scoops. You can easily lose track of how many scoops you have added! Use a 1-cup scoop, so that you have to measure out only 2 scoops.
Know basic equivalents.
These can help you easily convert measurements on containers in the grocery store to the amounts you need for a recipe. For example, if your recipe calls for 2 cups of milk, know you need to buy at least a 1-pint carton of milk at the grocery store.
1 Tablespoon = 3 teaspoons
4 Tablespoons = ¼ cup = 2 fluid ounces
5 Tablespoons + 1 teaspoon = 1/3 cup
8 Tablespoons = ½ cup = 4 fluid ounces
16 Tablespoons = 1 cup = 8 fluid ounces
2 cups = 1 pint = 16 fluid ounces
4 cups = 1 quart = 32 fluid ounces
8 cups = 2 quarts = ½ gallon = 64 ounces
4 quarts = 1 gallon = 128 ounces
For measuring solid stick butter or margarine
½ stick = ¼ cup
1 stick = ½ cup
2 sticks = 1 cup
Measuring Dry or Solid Ingredients

Measuring dry or solid ingredients
To measure large amounts of dry or solid ingredients, like flour or butter, use dry measuring cups. To measure smaller amounts, use measuring spoons. When purchasing your dry measuring cups and spoons, choose cups with the measurements molded or engraved onto them, so that you can still read the measurements if the ink wears off over time.
Use a measuring cup that is exactly the size you need.
Most sets of dry measuring cups will include ¼-cup, 1/3-cup, ½-cup, and 1-cup sizes. Some sets will also include 1/8-cup and 2/3-cup sizes.
Fill the measuring cup all the way to the top.
Here are tips for different types of ingredients.
- For most dry ingredients, like sugar or rice: use the measuring cup to scoop the ingredient out of the container, or pour from the container into the measuring cup.
- For flour: hold the measuring cup over the container of flour or over the sink. Use a large spoon to scoop flour out of the container and into the measuring cup until the cup is overflowing. Do not pack the flour into the cup. Use the flat side of a knife (not the sharp side) to run over the top of the cup, scraping off the extra flour.
- For dense, semi-solid ingredients like softened butter, margarine, or peanut butter: use a spoon to scoop the ingredient from the container. Use the spoon to press the ingredient into the cup to prevent air pockets. Continue to add and press until the measuring cup is full.
- For brown sugar: use a spoon to scoop the brown sugar from the container. Use the spoon to press the brown sugar into the measuring cup. If your recipe calls for “lightly packed” brown sugar, press lightly. If it calls for “packed” or “firmly packed” brown sugar, press harder until all the air spaces are filled. When the cup is turned over, the brown sugar should come out in the shape of the measuring cup.
Level the ingredients with the top edge of the measuring cup.
Run the flat edge of a knife across the top of the cup to scrape off any excess ingredient. Do this over the original container or over the sink, to make cleanup easier.
Measuring Liquid Ingredients

Measuring liquid ingredients
You can measure tablespoons and teaspoons of liquids with the same measuring spoons you use for dry ingredients. But measuring larger amounts of liquids is not the same as measuring dry or solid ingredients. To measure liquids correctly and get them out of the cup easily, use a liquid measuring cup with a pouring spout.
Choose clear measuring cups
So that you can easily see the level of the liquid inside.
Choose measuring cups with large, easy-to-read markings
To show the measurements. If possible, choose cups with the measurements molded or etched onto the cup, so that you can still read the measurements if the ink wears off over time.
Place the measuring cup flat on the countertop or table
So the liquid inside will be level and you will get an accurate measurement. When reading the measurement, keep your face at eye level with the cup. Looking at it from above will cause you to get an incorrect measurement.
Use a spoon or a rubber spatula
To get thick liquids, like molasses, out of the cup.
Safety

10 Common Food Mistakes
Handling foods safely is more than just throwing away expired milk or washing your fruits and vegetables. While these actions are important, there are several more common food safety mistakes that can result in major consequences.
Don’t be one of 48 million Americans sickened by food poison each year. Avoid these 10 common yet dangerous food safety mistakes.
Mistake #1:
Tasting food to see if it’s still good. Never taste your food to check if it has spoiled. You can’t taste, see, or even smell the bacteria that causes food poisoning, and tasting just a tiny bit of contaminated food can cause serious illness. Throw away all expired food before harmful bacteria grows.
Mistake #2:
Putting cooked or ready-to-eat foods back on a plate that held raw meat. Never let raw meat, poultry, or seafood touch cooked meat or any ready-to-eat foods, as this can cause cross-contamination. Foodborne pathogens from the raw meat can easily spread to ready-to-eat foods and case food poisoning. Always use separate plates, cutting boards, and utensils to keep away raw meats, poultry, and seafood separate from ready-to-eat foods.
Mistake #3:
Thawing food on the counter. Never thaw food on the counter. Harmful foodborne pathogens multiply rapidly when foods are in the danger zone between 40°F and 140°F. Instead, always thaw foods in the refrigerator, in cold water, or in the microwave.
Mistake #4:
Washing meat or poultry. Never wash raw meat or poultry because the water can easily spread bacteria to your sink, countertops, and other kitchen surfaces. Only wash raw fruits and vegetables.
Mistake #5:
Letting food cool before putting it in the fridge. Don’t leave food out of the refrigerator for more than two hours—or one hour if it is over 90°F outside. Illness-causing bacteria can grow rapidly when perishable foods are left in the danger zone—between 40°F and 140°F. Always refrigerate foods in a timely manner. If you are on a road trip, tailgating, or picnicking, pack perishable foods in a well-insulated cooler.
Mistake #6:
Eating raw cookie dough (and other foods containing uncooked eggs and flour). Never eat any raw eggs because they may contain Salmonella or other harmful bacteria. Instead, cook eggs thoroughly and avoid foods that contain raw or undercooked eggs. Even raw dough without eggs should not be consumed as raw flour may contain E. coli and cause people to get sick.
Mistake #7:
Marinating meat or seafood on the counter. Using raw meat marinade on cooked food. Never marinate meat, poultry, or seafood on the counter or use the same marinade for raw meat and cooked food. If you marinate on the counter, harmful germs can multiply rapidly when in the danger zone—between 40°F and 140°F. In addition, if you use the same marinade on raw and cooked meats, the harmful bacteria from the raw food can spread to the cooked food. Always marinate raw meat, seafood, and poultry in the refrigerator and only reuse marinade if you bring it to a boil just before using.
Mistake #8:
Undercooking meat, poultry, seafood, or eggs. Cooked food is safe only after it’s been heated to a high enough internal temperature to kill harmful bacteria. In order to avoid eating undercooked foods, you must use a food thermometer—the only way to determine if cooked foods are safe to eat. Do not rely on sight, smell, or taste to tell whether your food is done.
Mistake #9:
Not washing your hands. Illness-causing bacteria can survive in many places—including on your hands. Always wash your hands for at least 20 seconds with soap and warm, running water before and after handling food.
Mistake #10:
Not replacing sponges and dish rags. Ironically, sponges and dishrags are some of the dirtiest tools in your kitchen. Sponges and dishrags can hold harmful foodborne pathogens and cause a serious health risk. Always sanitize your sponges at least every other day and replace them every week or two for best protection against germs.
Academy of Nutrition and Dietetics
Reviewed April 2017
Cooking Safety

Safe End Point Temperatures for Food
Eggs and Egg Dishes
- Eggs cook until yolk and whites are firm
- Egg dishes: 160°
Ground Meat and Meat Mixtures
- Turkey, Chicken: 165°
- Veal, Beef, Lamb, Pork: 160°
Fresh Beef
- Medium Rare: 145°
- Medium: 160°
- Well Done: 170°
Poultry
- Chicken, whole: 180°
- Turkey, whole: 180°
- Poultry, Breasts, Roast: 165°
- Poultry, Thighs, Wings: 165°
- Stuffing (cooked alone or in bird): 165°
- Duck and Goose: 180°
Ham
- Fresh (raw): 160°
- Pre-cooked (to reheat): 140°
Fresh Veal
- Medium rare: 145°
- Medium: 160°
- Well done: 170°
Fresh Lamb
- Medium Rare: 145°
M1385 (POD-07-17) Distributed by Jenna Schilling, PhD, Extension Associate, Human Sciences.
Copyright 2017 by Mississippi State University. All rights reserved. This publication may be copied and distributed without alteration for nonprofit educational purposes provided that credit is given to the Mississippi State University Extension Service.
Produced by Agricultural Communications.
We are an equal opportunity employer, and all qualified applicants will receive consideration for employment without regard to race, color, religion, sex, national origin, disability status, protected veteran status, or any other characteristic protected by law.
Extension Service of Mississippi State University, cooperating with U.S. Department of Agriculture. Published in furtherance of Acts of Congress, May 8 and June 30, 1914. GARY B. JACKSON, Director
Food Safety

Clean / Separate / Cook / Chill
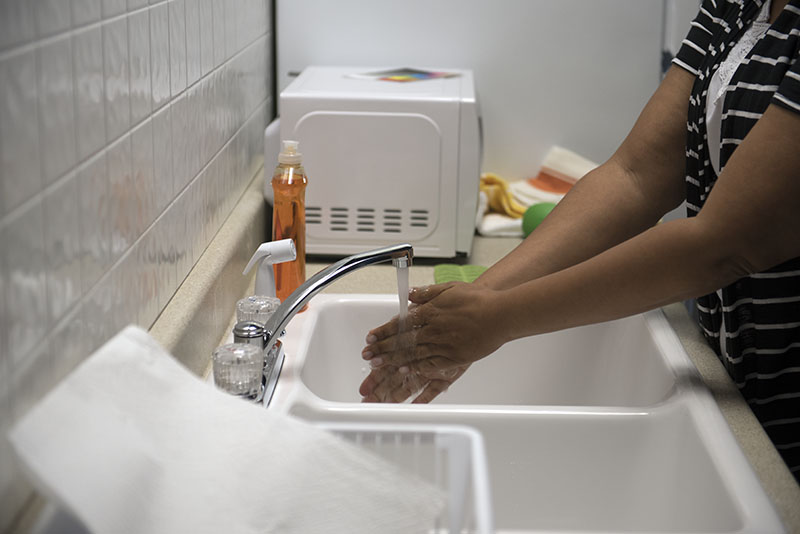
CLEAN: Wash Hands and Surfaces Often
Bacteria can be spread throughout the kitchen and get onto hands, cutting boards, utensils, counter tops, and food.
- Wash your hands with warm water and soap for at least 20 seconds before and after handling food and after using the bathroom or changing diapers. Wash your hands after playing with pets or visiting petting zoos.
- Rub your hands together to make a lather and scrub them well. Be sure to scrub the backs of your hands, between your fingers, and under your nails.
- 20 seconds is about the time it takes to sing the “Happy Birthday” song twice.
- Dry your hands with a clean cloth or paper towel.
- Wash your countertops, cutting boards, dishes, and utensils with hot, soapy water after preparing each food item and before going on to the next food item.
- Consider using paper towels to clean up kitchen surfaces. If you use cloth towels, wash them often in the hot cycle of your washing machine.
- Keep your fridge clean, too: wipe spills immediately and regularly clean the inside with hot water and liquid soap. Dry with paper towels.
- Rub firm-skinned fruits and vegetables, including those with skins and rinds that are not eaten, under running tap water or scrub with a clean vegetable brush while rinsing with running tap water.
- Packaged fruits and veggies labeled “ready-to-eat,” “washed,” or “triple-washed” should not be washed. Doing so may increase the risk for cross-contamination.
- Do not use soap or bleach to wash produce. These products are not intended for consumption.
- Keep books, backpacks, or shopping bags off the kitchen table or counters where food is prepared or served.
SEPARATE: Don't Cross Contaminate
Cross contamination is how bacteria can be spread. When handling raw meat, poultry, seafood, and eggs, keep these foods and their juices away from ready-to-eat foods. Always start with a clean scene—wash hands with warm water and soap. Wash cutting boards, dishes, countertops, and utensils with hot, soapy water.
- Separate raw meat, poultry, seafood, and eggs from other foods.
- In the grocery store: place these products in separate plastic bags to prevent juices from getting on other foods. If you use reusable grocery bags, wash them frequently in the washing machine.
- At home: place these products in sealed plastic bags or containers on the bottom shelf of the refrigerator to prevent juices from contaminating other foods. If you don’t plan to use these foods within a few days, freeze them.
- Keep fresh fruits and vegetables separate from raw meat, poultry, seafood, and eggs.
- Use one cutting board for fresh produce and a separate one for raw meat, poultry, and seafood.
- Use a food thermometer, which measures the internal temperature of cooked meat, poultry, and egg dishes, to make sure that the food is cooked to a safe internal temperature.
- Never place cooked food on a plate that previously held raw meat, poultry, seafood, or eggs.
- Sauce that is used to marinate raw meat, poultry, or seafood should not be used on cooked food unless it is boiled first to destroy any harmful bacteria.
COOK: Cook to Proper Temperatures
Food is safely cooked when it reaches a high enough internal temperature to kill the harmful bacteria that cause foodborne illness. Use a food thermometer to measure the internal temperature of cooked foods.
- Color is Not a Reliable Indicator of Safety
- Color and texture are not reliable indicators of whether food has reached a high enough internal temperature to destroy pathogens.
- According to USDA research, 1 in 4 hamburgers turn brown before reaching a safe internal temperature.
- Use a food thermometer, which measures the internal temperature of cooked meat, poultry, and egg dishes, to make sure that the food is cooked to a safe internal temperature.
- Food thermometers should be placed in the thickest part of the food, making sure not to touch bone, fat, or gristle.
- Cook beef roasts and steaks to a safe minimum internal temperature of 145°F. Cook pork to a minimum of 145°F. All poultry should reach a safe minimum internal temperature of 165°F throughout the bird, as measured with a food thermometer.
- Cook all ground meat to 160°F. Information from the Centers for Disease Control and Prevention (CDC) links eating undercooked ground beef with a higher risk of illness. Remember, color is not a reliable indicator of doneness. Use a food thermometer to check the internal temperature of your burgers.
- Cook eggs until the yolk and white are firm, not runny. Don’t use recipes in which eggs remain raw or only partially cooked. Casseroles and other dishes containing eggs should be cooked to 160°F.
- Cook fish to 145°F or until the flesh is opaque and separates easily with a fork.
- Bring sauces, soups, and gravies to a boil when reheating. Heat other leftovers thoroughly to 165°F.
- For best microwave-safe cooking:
- Make sure there are no cold spots in food (where bacteria can survive) when cooking in a microwave oven. For best results, cover food, stir, and rotate for even cooking. If there is no turntable, rotate the dish by hand once or twice during cooking.
- Use microwave-safe cookware and plastic wrap when cooking foods in a microwave oven.
- Read and follow package cooking directions; most convenience foods are not ready to eat out of the container. Make sure you know if the directions require a microwave oven or a conventional oven.
- Know your microwave’s wattage; if it is lower than the wattage in cooking instructions, the food will take longer to heat up.
CHILL: Refrigerate Promptly
Refrigerate foods quickly because cold temperatures slow the growth of harmful bacteria. Do not over-stuff the refrigerator. Cold air must circulate to help keep food safe. Keeping a constant refrigerator temperature of 40°F or below is one of the most effective ways to reduce the risk of foodborne illness. Use an appliance thermometer to be sure the temperature is consistently 40°F or below. The freezer temperature should be 0°F or below.
- Don’t go too low: As temperatures approach 32°F, ice crystals can form and lower the quality of foods.
- Never let raw meat, poultry, eggs, cooked food, or cut fresh fruits or vegetables sit at room temperature more than two hours before putting them in the refrigerator or freezer (one hour when the temperature is above 90°F).
- Never defrost food at room temperature. Food must be kept at a safe temperature during thawing. There are three safe ways to defrost food: in the refrigerator, in cold water, and in the microwave using the defrost setting. Food thawed in cold water or in the microwave should be cooked immediately.
- Always marinate food in the refrigerator.
- Divide large amounts of leftovers into shallow containers for quicker cooling in the refrigerator.
- Use or discard refrigerated food on a regular basis.
- To prevent the spread of harmful bacteria, wipe spills immediately. Regularly clean the inside of your fridge with hot water and liquid soap, and dry with a clean cloth or paper towels.
Keeping Cold Lunches Cold
Prepare cooked food, such as turkey, ham, chicken, and vegetables or pasta salads, ahead of time to allow for thorough chilling in the refrigerator. Divide large amounts of food into shallow containers for fast chilling and easier use. Keep cooked food refrigerated until time to leave home.
To keep lunches cold away from home, include a small frozen gel pack or frozen juice box. Of course, if there’s a refrigerator available, store perishable items there upon arrival. Insulated, soft-sided boxes or bags are best for keeping food cold, but metal or plastic lunch boxes and paper bags can also be used. If using paper lunch bags, create layers by double bagging to help insulate food.
Some food is safe without a cold source. Items that don’t require refrigeration include whole fruits and vegetables, hard cheese, unopened canned meat and fish, chips, breads, crackers, peanut butter, jelly, mustard, and pickles.
Keeping Hot Lunches Hot
Use an insulated container to keep food like soup, chili, and stew hot. Fill the container with boiling water, let stand for a few minutes, empty, then put in the piping hot food. Keep the insulated container closed until lunchtime to keep the food hot—140°F or above.
For more information, visit the USDA Food Safety and Inspection Service (FSIS).
Refrigerating or Freezing Foods

How long can you store foods?
These short but safe time limits for home-refrigerated foods will keep them from spoiling or becoming dangerous to eat. The guidelines for freezer storage are for quality only. Frozen foods remain safe indefinitely.
|
Category |
Food |
Refrigerator (40F or below) |
Freezer (0F or below) |
|
Salads |
Egg, chicken, ham, tuna, and macaroni salads |
3 to 5 days |
Does not freeze well |
|
Hot dogs |
Opened package |
1 week |
1 to 2 months |
|
Unopened package |
2 weeks |
1 to 2 months |
|
|
Luncheon Meat |
Opened package or deli sliced |
3 to 5 days |
1 to 2 months |
|
Unopened package |
2 weeks |
1 to 2 months |
|
|
Bacon and sausage |
Bacon |
7 days |
1 months |
|
Sausage, raw—from chicken, turkey, pork, beef |
1 to 2 days |
1 to 2 months |
|
|
Hamburger and other ground meats |
Hamburger, ground beef, turkey, veal, pork, lamb, and mixtures of them |
1 to 2 days |
3 to 4 months |
|
Fresh beef, veal, lamb, and pork |
Steaks |
3 to 5 days |
6 to 12 months |
|
Chops |
3 to 5 days |
4 to 6 months |
|
|
Roasts |
3 to 5 days |
4 to 12 months |
|
|
Fresh poultry |
Chicken or turkey, whole |
1 to 2 days |
1 year |
|
Chicken or turkey, pieces |
1 to 2 days |
9 months |
|
|
Soups and stews |
Vegetable or meat added |
3 to 4 days |
2 to 3 months |
|
Leftovers |
Cooked meat or poultry |
3 to 4 days |
2 to 6 months |
|
Chicken nuggets or patties |
3 to 4 days |
1 to 3 months |
|
|
Pizza |
3 to 4 days |
1 to 2 months |
Partnership for Food Safety Education 2016
Storing Food at Room Temperature

Storing Food at Room Temperature
- Cooked foods should not remain at room temperature for more than two hours. The sooner you can get it in the refrigerator or freezer, the better.
- Some foods, such as apples, can be left at room temperature and can be stored for 3–4 days.
- Food should not be left out in a pan/casserole dish on the stove to cool. It needs to be in the refrigerator as soon as possible.
- Some foods can be left at room temperature and stored on the counter-top or in cupboards in covered containers.
- Bread can be left on the counter in its original packaging, but it will keep longer if kept in the refrigerator. Bread can also be stored in the freezer to keep it for use at a later time.
Cooling and Refrigerating Food

Cooling and Refrigerating Food
- Separate and refrigerate the portion to be served for your next meal BEFORE you put the food on the table. This keeps food quality higher by preventing leftovers from becoming “picked-overs.” It also helps keep food safe.
- Refrigerate leftovers in shallow containers so they cool faster in the refrigerator. It’s not necessary for a food to be completely cool before it’s refrigerated. To help food cool slightly before refrigeration, place a shallow container of food on a cooling rack to allow air to circulate all around the plan for about 20 to 30 minutes.
- Limit depth of food to 2 inches. LOOSELY cover food upon refrigeration. This allows heat to escape and protects from accidental contamination from other foods during cooling.
- Avoid letting perishable cooked foods, such as meat, poultry, seafood, eggs, dairy products, cooked rice, pasta, and vegetables sit at room temperature longer than TWO hours TOTAL—the TOTAL is the total of the first and second use.
- Refrigeration does not stop bacteria from growing, but it slows the process. Most food will only keep in the refrigerator for a short period of time.
- Food should always be covered or in a storage container with a sealed lid to slow the growth of bacteria.
- Label and date your leftover containers to keep track of how long it has been in the refrigerator.
- If food looks or smells bad, the general rule is, “When in doubt, throw it out!”
- Do not overstuff the refrigerator. Cold air needs to be able to circulate to keep food safe and prevent freezing.
- A refrigerator temperature of 40°F or lower will slow bacterial growth. Keep your freezer at 0°F or lower. Freezing will stop most bacteria growth so frozen foods keep longer than those at refrigerator temperature. Freezing DOES NOT kill bacteria—it is still important to handle food safely.
As a general rule, use refrigerated leftovers within four days for best safety and quality. Freeze for longer storage. Cool foods in the refrigerator before putting them in your freezer.
Freezing Food

Freezing Food
- Your freezer should be kept at or below 0°F. This can be checked by keeping a thermometer in your freezer.
- If you are not planning to eat your leftovers within a few days or want to keep leftovers longer, store them in the freezer. This will stop bacteria from growing.
- Freeze foods in portion sizes you’ll need for future meals. For example, if there are two in your family and you each eat a cup of rice for a meal, freeze in two-cup portions.
- To hasten thawing when freezing foods: freeze in a thinner, flattened shape in freezer bags or freezer foil. A round shape takes longer to thaw through to the middle. Flatter packages also will stack better in your freezer.
- Remember to cool foods to refrigerator temperature before putting them in your freezer.
- Pack foods fairly tightly into containers or press out excess air when packing food in bags. For most foods, it’s helpful to leave a little space (about ½ inch) between the food and the freezer package closure to allow for expansion of the food as it freezes.
- While frozen food remains safe indefinitely at 0°F, the quality deteriorates the longer it’s stored.
- “Freezer burn,” when the surface of the food appears light-colored and dried out, occurs when moisture on the surface evaporates. Proper cooling, air removal, moisture-vapor-resistant packaging, a tight seal, and an appropriate length of storage help prevent freezer burn. While a food with freezer burn is safe to eat, the quality is lower.
- Prevent ice cream freezer burn by placing plastic wrap on the top before replacing the lid.
- Label each package with the type and amount of contents. Use the dates to assure products are eaten while the quality is still good.
- If you’re freezing several packages at once, leave a little space between them so air can circulate freely and they freeze faster. Move them closer together when they’re frozen.
Foods that DON'T freeze well
- Cooked eggs
- Cooked “chunks” of potatoes (mashed and twice-baked may freeze satisfactorily)
- Custards and cream puddings, by themselves or in pies
- Potato salad
- Pasta
- Raw, watery vegetables such as lettuce, cucumbers, and radishes; tomatoes, celery, and cabbage might be satisfactorily frozen as an ingredient in an already cooked dish such as a soup or casserole.
- Yogurt and sour cream
- Mayonnaise may separate during freezing and thawing
- Sauces and gravies thickened with flour or cornstarch may separate and bread down when frozen
- Fried foods may lose their crispiness
- Crumb toppings, such as on casseroles, may become soggy after freezing.
Sometimes you will see these foods in commercially frozen products because food companies have equipment that freezes food faster and helps retain quality better. Also, various ingredient, generally unavailable to home cooks, are used commercially to help prevent frozen foods from breaking down.
Before you double a recipe for frozen leftovers, experiment by freezing a small amount the next time you make the recipe. If you’re satisfied with the results, prepare extra food for freezing when you make the recipe again.
As a general rule, foods with high water content, such as the vegetables in our list, do not freeze well. The water in food expands during freezing and breaks down the food’s structure, making the food mushy when thawed. This is why frozen fruit packages often advise eating the fruit while still slightly frozen.
Packaging food for the freezer
Freezing Wrapping Materials
- Suitable freezer wrapping materials include freezer paper, plastic freezer bags, and freezer aluminum foil.
- Check wrapping labels for specific information about whether the wrappings work for freezing. For example, not all plastic bags are designed for freezer use. It’s important to use materials intended for freezing as they’re more likely to keep moisture out and less likely to tear in the freezer.
- For freezer paper, check directions for which side of the paper is placed next to the food. Unless directed otherwise, the plastic-coated side goes next to food. Secure freezer paper with freezer tape.
Freezer containers
- Rigid freezer containers include metal, foil, plastic, glass, and ceramic containers identified by the manufacturer as suitable for freezing. CAUTION: Carefully read manufacturer’s directions about safe handling when using glass or ceramic dishes labeled freezer/microwave/oven safe.
- Foil and metal pans for well for freezing foods you’ll reheat in the oven. Cover pan tightly with freezer-quality foil or place in a plastic freezer bag. Metal/foil pans cool quicker and heat faster than ceramic or glass containers. Note: foil containers aren’t meant to be reused; discard after using.
- Consider freezer/microwave-safe containers for foods you’ll reheat in the microwave.
- Choose a container that fits the amount of food you’re freezing.
- Some containers aren’t suitable for freezing. For example, milk and cottage cheese cartons aren’t moisture-vapor-resistant enough for freezing.
Thawing Food Safely

Thawing food safely
DO NOT thaw perishable foods at room temperature. Just ONE bacterium, doubling every 20 minutes, could grow to 64 bacteria in two hours, and 2,097,152 bacteria in seven hours!
If perishable foods, such as meat, are left at room temperature too long, bacteria may grow and produce heat-resistant toxins that can cause food-borne illness. Cooking may not be able to destroy these toxins.
- It’s best to plan ahead for slow, safe thawing in the refrigerator. Small items may thaw overnight in the refrigerator. Larger foods may take longer—allow approximately one day for each 5 pounds of weight.
- Thaw packages of raw meat, poultry, or seafood on plates on lower shelves of refrigerators to prevent their juices from dripping on other foods.
- For faster thawing, place food in a leak-proof plastic bag and immerse bag in COLD water. Change the water every 30 minutes to assure it stays cold. DO NOT use hot water. After thawing, refrigerate the food until ready to use. Food thaws in cold water at the rate of approximately a pound per half hour.
- If food is thawed in the microwave, cook it right away. Unlike food thawed in a refrigerator, microwave-thawed foods reach temperatures that encourage bacterial growth. Cook immediately to kill any bacteria that may have developed and to prevent further bacterial growth.
If thawing in a plastic freezer bag in the microwave, follow manufacturer’s directions for such things as venting, recommended heat settings, types of food suitable for microwave-thawing, etc. for that specific bag.
Follow microwave manufacturer’s directions for your specific microwave.
Washing Your Hands

Washing your hands
1. Wet your hands with warm (110°F), running water.
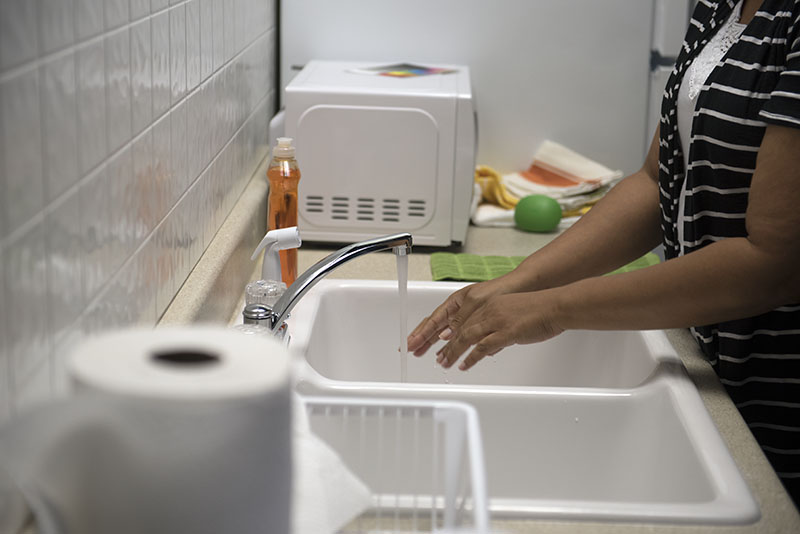
2. Apply soap.
3. Rub hands together for at least 20 seconds.

4. Clean under fingernails and between fingers.
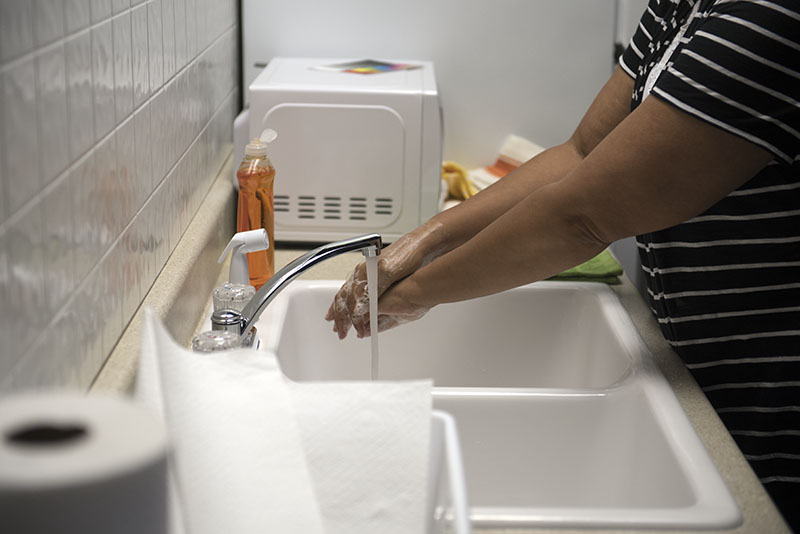
5. Rinse hands thoroughly under running water.
6. Dry hands. Throw the towel in a trash can.
M1386 (POD-07-17) Distributed by Jenna Schilling, PhD, Extension Associate, Human Sciences.
Copyright 2017 by Mississippi State University. All rights reserved. This publication may be copied and distributed without alteration for nonprofit educational purposes provided that credit is given to the Mississippi State University Extension Service.
Produced by Agricultural Communications.
We are an equal opportunity employer, and all qualified applicants will receive consideration for employment without regard to race, color, religion, sex, national origin, disability status, protected veteran status, or any other characteristic protected by law.
Extension Service of Mississippi State University, cooperating with U.S. Department of Agriculture. Published in furtherance of Acts of Congress, May 8 and June 30, 1914. GARY B. JACKSON, Director
Freezing Vegetables

Freezing Vegetables
Freezing is a great way to keep fresh vegetables tasty and nutritious for a longer time than keeping them in the refrigerator or on the counter top.
Freezing doesn’t sterilize the vegetables, but the cold temperatures slow down the growth of bacteria. And the processes that cause vegetables to rot and spoil slow down, too.
Start with high-quality fresh vegetables. And freeze them soon after you get them.
Handle them carefully, to keep them from getting bruised or damaged before you freeze them.
Choose the Right Container
Choose containers that are intended to be used in the freezer. They should be moisture- and vapor-resistant. They should be durable and not become brittle in the freezer. And they should be easy to seal securely.
Good containers include plastic freezer containers, flexible freezer bags, or wide-mouth glass canning jars.
Don’t use the plastic containers that yogurt, tub margarine, or cottage cheese come in. And don’t use cardboard milk cartons or ice cream containers. And regular jars, like the ones jelly or mayonnaise come in, are made of thin glass that is likely to break when it is frozen.
Choose and Wash the Vegetables
Use the freshest, highest-quality vegetables you can find.
If you are picking them from your garden, pick them early in the morning, when it is still cool. Freeze them within a few hours after picking them.
Wash the vegetables well in cold water. Let the water run over them to wash away any dirt. If you are washing them in a sink or tub full of water, lift the vegetables out of the water and let the dirt settle to the bottom.
Sort the vegetables according to size. It will be easier to pack vegetables of similar size into the same container.
Blanch the Vegetables
Blanching means that you put the vegetables into boiling water for a short time before you put them in the freezer containers. For some vegetables, steaming is a better way to blanch.
Blanching is an important step for many reasons:
- It slows or stops the enzymes that cause food to rot or spoil.
- It cleans the surface of the vegetables, to remove any dirt or bacteria.
- It brightens the color.
- It helps keep the vitamins in the food.
- It softens or wilts the vegetables to make them easier to pack.
The amount of time you leave the vegetables in the boiling water is extremely important. The time varies according to the size of the vegetables and from one kind of vegetable to another.
Blanching for too short a time stimulates the enzymes that cause spoiling and is worse than not blanching at all.
Blanching for too long a time makes the vegetables lose flavor, color, and vitamins.
Safe Cooking Guidelines

SAFE COOKING GUIDELINES
|
SAFE MINIMUM INTERNAL TEMPERATURES as measured with a food thermometer |
|
|
Beef, pork, veal, and lamb (roast, steaks, and chops) |
145°F with a three-minute “rest time” after removal from the heat source |
|
Ground meats |
165°F |
|
Poultry (whole, parts, or ground) |
165°F |
|
Eggs and egg dishes |
160°F, but cook eggs until both the yolk and the white are firm; scrambled eggs should not be runny |
|
Leftovers |
165°F |
|
Finfish |
145°F |
|
GUIDELINES FOR SEAFOOD |
|
|
Shrimp, lobster, crabs |
Flesh pearly and opaque |
|
Clams, oyster, and mussels |
Shells open during cooking |
|
Scallops |
Milky white, opaque and firm |
Partnership for Food Safety Education 2016
Food-borne Illness

Keep safe from food-borne illness!
Follow these steps for keeping your food safe and your family healthy!
Check
- Check fruits and vegetables for mold, damage, cuts, and bruises.
- Check for expiration dates.
- Make sure that pre-cut fruit and salads are refrigerated.
- Check cans for dents, holes, and rusted seams.
- Make sure cans are not swollen.
Rinse
- Just before you use them, rinse fruits and vegetables.
- Scrub gently to remove any dirt you can see.
- Do not use soap or bleach.
Chill
- Keep your refrigerator at or below 40 degrees F.
- Refrigerate all cut, peeled, or cooked fresh fruits and vegetables within 2 hours.
Clean
- Wash your hands with soap and warm water for at least 20 seconds before and after you handle meat, fruits, and vegetables.
- Clean all counters, cutting boards, and knives in hot soapy water before and after using them.
Separate
- Keep raw meat, seafood, chicken, eggs, and household chemicals separate from fresh fruits and vegetables.
- Do not use the same cutting board or utensils for raw meat or chicken and for other foods. Use different ones, or wash them with hot soapy water before you use them for anything else.
Throw Away
- If foods that will be eaten uncooked have touched raw meat, poultry, seafood, or raw eggs, throw them away.
- Throw away any foods that are past their expiration dates.
- Throw away any foods that look moldy or spoiled. DO NOT TASTE them to see if they are still good.
Keeping Fresh Fruits & Vegetables Tasting Good

Keeping Fresh Fruits & Vegetables Tasting Good!
Keep these in the refrigerator
Fruits and Melons
- Apples (to keep for more than 7 days)
- Apricots
- Asian pears
- Blackberries
- Blueberries
- Cherries
- Cut fruit
- Figs
- Grapes
- Raspberries
- Strawberries
Vegetables
- Artichokes
- Asparagus
- Green beans
- Lima beans
- Beets
- Belgian endive
- Broccoli
- Brussels sprouts
- Cabbage
- Carrots
- Cauliflower
- Celery
- Cut vegetables
- Fresh herbs (but not basil)
- Green onions
- Greens (collard, mustard, turnip)
- Leeks
- Lettuce
- Mushrooms
- Peas
- Radishes
- Spinach
- Sprouts
- Summer squashes
- Sweet corn
Keep these on the counter until ripe, then keep them in the refrigerator
Fruits and Melons
- Avocados
- Kiwifruit
- Nectarines
- Peaches
- Pears
- Plums
- Plumcots
Keep these on the counter
Fruits and Melons
- Apples (to keep for less than 7 days)
- Bananas
- Grapefruit
- Lemons
- Limes
- Mandarins
- Mangoes
- Muskmelons
- Oranges
- Papayas
- Persimmons
- Pineapple
- Plantains
- Pomegranates
- Watermelons
Vegetables
- Basil (keep in a glass of water)
- Cucumbers
- Eggplant
- Ginger
- Jicama
- Peppers
- Pumpkins
- Tomatoes
- Winter squashes
Keep these in the pantry or a cabinet or box. Protect them from light, but make sure air can get to them
Vegetables
- Garlic
- Dry onions
- Potatoes
- Sweet potatoes
Expiration Dates

What do those dates mean on the food I buy?
Food dating stamps, like the Nutrition Facts label, give you good information about the food you buy. They can tell you when to keep a food and eat it, and when you should throw it out! You just need to know what the different stamps mean to keep your food safe to eat and tasting good, too.
Most of the dates you see on food are for quality, not food safety. Foods are often safe to eat past the date on the label, as long as there are no visible signs that the food is spoiled.
Use-By
This is last date recommended for use of the food. For the best taste and texture, use the food before the date has passed. It is not a safety date, except when used for baby formula.
Generally, throw away any food that is past the Use-By date. Some canned foods may still be good, but, when you open the can, if the color, texture, or odor of the food isn’t right, throw it out!
Exp
“Exp” stands for “Expiration” date. For the best taste and texture, use the food before the date has passed.
Generally, throw away any food that is past the Expiration date. The exception is eggs. If they have been kept in the refrigerator, eggs can still be used 3 to 5 weeks after the Expiration date.
Sell-By
This date tells the store how long to keep the food on the shelf for sale. It is not a safety date.
Use before or shortly after the date has passed. Sometimes, grocery stores will have sales on foods that are close to their Sell-By date. You can get a good bargain, but be sure to use it soon!
Do not buy foods that are past their Sell-By date.
Best if used by/before
For the best taste and texture, use before or shortly after the date has passed. This is not a purchase or safety date.
Throw away any foods that are more than a few days past the date. If the foods have not been stored properly, throw them out earlier.
Special Cases
For baby formula or pre-packaged, washed produce (like bags of salad), throw it away immediately when the date has passed. No exceptions!
For more information:
Food Safety and Inspection Service. USDA. Food Product Dating. https://www.fsis.usda.gov/wps/portal/fsis/topics/food-safety-education/get-answers/food-safety-fact-sheets/food-labeling/food-product-dating/food-product-dating
Food Safety for Pre-Schoolers

Food Safety for Pre-Schoolers
Keeping food safe for your children helps keep them healthy. Good habits about food safety will last a lifetime!
Wash hands
Teach your children to wash their hands before and after eating, after using the bathroom, after playing with pets, and whenever their hands are dirty.
Keep a stool by the sink to help small children reach it more easily.
Sing the Alphabet Song or “Happy Birthday to You” or “Twinkle, Twinkle, Little Star” while hand washing. This will help you make sure that the children wash their hands for at least 20 seconds each time.
Let your children pick out a favorite soap that they will have fun using.
Children who wash their hands often are less likely to get sick.
Keep things clean
Small children get sick more easily because their immune systems are not fully developed. Keep food and the counter tops and table tops clean.
Wash surfaces and utensils before and after you prepare meals or snacks for your children.
Prevent choking
Don’t choose foods that are hard to swallow. Or cut them into pieces 1/2 inch or smaller. These foods include peanuts, popcorn, hot dog slices, hard candy, whole grapes, and cherry tomatoes.
Make sure your children sit down when they are eating. Don’t let them run, walk, play, or lie down while they have food in their mouths.
Pack a safe, healthy lunch
Keep cold foods cold by adding a frozen juice box, water bottle, or small ice pack to an insulated lunch bag. If you are using paper lunch sacks, double them up to help keep things cold. By lunch time, the juice box or water bottle will have thawed enough to drink!
Keep hot foods hot in an insulated thermos. Be sure to prime the thermos first, by filling it with boiling water. Let it stand for a few minutes, then pour the water out. Fill the thermos with piping hot soup or stew!
Keep snacks safe
If snacks come in a large box or bag, divide them up right away into small, single-serving bags. Many hands digging into the big box can spread germs to all the snacks inside.
Rinse fruits and vegetables before slicing them to serve as snacks.
Hard-cooked eggs
Hard-cooked eggs can be an easy and nutritious food for small children.
Before cooking, always keep the eggs in the refrigerator. After cooking, return them to the refrigerator within 2 hours.
If you are dyeing the eggs for the holidays, be sure to use food-safe coloring.
Choose healthy fish
The fats in fish and shellfish are good for young children, and adults, too! But some fish can also contain high levels of mercury and other toxic chemicals. Fish that are usually lower in mercury are catfish, pollock, salmon, sardines, tilapia, and trout
Food Safety at Barbecues

Food Safety at Barbecues and Picnics
Outdoor barbecues and picnics are a great way to connect with family and friends. However, careless food handling could cause foodborne illness and quickly make you an unpopular host. Taking just a few simple steps can greatly reduce the risk of sickness. These tips will help ensure that your food stays safe and your guests stay healthy.
Stay Out of the Danger Zone!
Just like humans, bacteria thrive in temperatures that are not too hot or too cold. The “danger zone” is 40 to 140 degrees Fahrenheit. Dangerous bacteria are more likely to grow in this temperature range. Keep cold foods below 40° F and hot foods above 140° F.
Thaw Appropriately
Frozen meat should never be thawed at room temperature. Instead, thaw in the refrigerator ahead of time. If it’s last minute, submerge sealed packages in cold (not warm or hot) water, or thaw in the microwave. Thoroughly cook foods immediately after microwave thawing.
Marinate Well
Marinating meat can improve tenderness, juiciness, and flavor. Always marinate food in the refrigerator, not on the countertop. If you plan to use the marinade as a baste during grilling, reserve some for basting before you put the raw meat in it. Discard marinade as soon as you take the meat out of it.
Precook Wisely
Precooked meats such as hot dogs, smoked sausages, chicken breasts, or burgers are great options that are available at many retail stores. Simply follow the package instructions for reheating on the grill. If you precook foods yourself, make sure they go immediately on the grill; don’t hold them at room temperature before putting on the grill.
Use Coolers Properly
When picnicking or tailgating away from home, use a cooler to store anything that was refrigerated. Fill it just before leaving home, add plenty of ice, and don’t open the cooler repeatedly; it makes the ice melt faster. Consider having a separate tub or cooler for drinks to avoid repeatedly opening the cooler with perishable foods. Always separate raw meat from ready-to-eat foods like salads and desserts. Try to keep the cooler in a shaded area to maintain temperature more efficiently.
Cook to Temp
Digital food thermometers can be purchased for around $10, and they’re easy to use and read. Consider them an easy and inexpensive way to both prevent foodborne illness and make sure you don’t overcook your steaks. The thermometer should be placed in the center of the food, not touching bones or big pieces of fat or gristle. Use the cooking temperatures chart to determine when different meat products are safe.
Serve Safely
Keep cold foods cold by placing the bowl of food inside of a slightly larger bowl filled with ice. Keep hot foods hot on the grill (not directly over the coals) and with crock pots, chafing dishes, or “beer baths.” To make a beer bath, fill a pan with beer, juice, broth, or other liquid, and place it on the grill; after cooking burgers, chicken, or brats, place them in the hot liquid to keep the food hot and add extra flavor.
A general rule of thumb is never to leave perishable items out of the refrigerator for more than 2 hours, or for more than 1 hour when the outside temperature is above 90°F. Here in Mississippi, the summer temperature can soar above 90°F for weeks on end. It’s important to make sure food is not left out more than an hour on these hot days. The food will not only be safer, but it will also look better and taste fresher. In hotter months, consider holding your gathering in the evening hours, when temperatures cool off and your guests may be more comfortable. Also consider adding nonperishable items to your picnic. Whole fruits like grapes, apples, bananas, oranges, peaches, and cherry tomatoes, along with crackers, pretzels, nuts, chips, breads, and cookies can be added to the menu and don’t have to take up valuable cooler space. However, cut or pre-peeled fruits and vegetables should always be kept cool, and you should follow the same handling guidelines for other refrigerated items.
Handle Leftovers Correctly
Put food in the refrigerator, freezer, or cooler within 2 hours if the temperature outside is less than 90°F, or within 1 hour if the temperature is above 90°F. If foods stay out for too long, or if you are unsure whether or not they are safe, discard them. Reheat leftovers to 165°F.
Clean Thoroughly
Never put cooked meat or other foods on the same plate that held raw meat. That raw meat juice contains bacteria that will recontaminate your food. Don’t want to wash double dishes? Use disposables for raw and cooked foods. Always wash your hands after handling raw meat and before you touch cooked meat.
If you are away from home, make sure you have a potable water source for cleanup, or bring containers from home if necessary. Supplement water with antibacterial wipes for cleaning tables and other surfaces, and consider using disposable containers and utensils, especially for raw items.
Safe Internal Temperatures for Meat and Poultry Products
Product Safe internal temperature (degrees Fahrenheit)
- Poultry (chicken or turkey): whole birds, breast meat, legs, thighs, wings: 165°
- Ground poultry (chicken/turkey): 165°
- Fish: 145°
- Pork chops, roasts, ribs: 145° plus 3 minutes standing time
- Lamb chops, roasts: 145° plus 3 minutes standing time
- Beef steaks, roasts: 145° plus 3 minutes standing time
- Ground beef, pork, lamb: 160°
Source: www.fsis.usda.gov
Publication 3046 (POD-05-17)
By Christine Leick Cord, PhD, Postdoctoral Associate, Food Science, Nutrition, and Health Promotion. Adapted from Food Safety and Inspection Service, United States Department of Agriculture. Safe Food Handling. Available Here.
Accessed May 2, 2017.
Copyright 2017 by Mississippi State University. All rights reserved. This publication may be copied and distributed without alteration for nonprofit educational purposes provided that credit is given to the Mississippi State University Extension Service.
Produced by Agricultural Communications. We are an equal opportunity employer, and all qualified applicants will receive consideration for employment without regard to race, color, religion, sex, national origin, disability status, protected veteran status, or any other characteristic protected by law.
Extension Service of Mississippi State University, cooperating with U.S. Department of Agriculture. Published in furtherance of Acts of Congress, May 8 and June 30, 1914. GARY B. JACKSON, Director
Kitchen Safety

A Safe Kitchen
Kitchens are among the busiest rooms in the house. They may also be some of the most dangerous rooms in the house. Remember to use safe cooking practices when working in the kitchen.
Tips to keep you and your family safe in the kitchen:
- Keep stove tops clean. Grease and food on stove tops can catch on fire. If a grease fire starts, use a lid or baking soda to put out the fire. Do not use water on grease fires.
- Store knives in a safe place away from children’s reach.
- Cut food on a clean cutting board and when cutting foods, cut away from you or straight down from you. Wear closed toed shoes to protect against a dropped knife.
- Keep the kitchen clean. Wipe up spilled beverages, grease, or food immediately. This prevents falls and discourages insects and rodents that can carry disease.
- Wash hands before, during, and after cooking to prevent the spread of germs.
- Change dish cloths and dish towels daily.
- Dry your hands completely before operating an electrical appliance. Unplug the appliance when not in use.
- Use an oven mitt or hot pad when removing food items from the oven or microwave oven. Most burns occur on hands.
- Store household cleaners, disinfectants, and insecticides in original containers. Store them separate from food and away from children to prevent poisoning.
- Keep dish towels and curtains away from the stove to prevent them from catching on fire.
- Wear short sleeves or roll up long sleeves while cooking.
- Remove a lid from a pan by lifting the lid away from you so the steam does not burn you.
- Turn pot handles away from the front of the stove, but not over another burner.
- Use a step stool or sturdy chair for reaching high shelves.
Multipurpose Cleaner
- 2 tablespoons baking soda (sodium bicarbonate)
- ½ cup household ammonia
- ¼ cup white vinegar
- 2 quarts (8 cups) warm water
- Stir all ingredients together in a bowl.
- Fill a CLEAN spray bottle (not recycled one) with cleaner and store the rest tightly sealed in a large bottle.
- Use with a cloth or sponge to clean.
- Rinse with a clean cloth or sponge after cleaning.
Uses: Tile and linoleum floors, Formica counter-tops, appliances, etc.
Cost: About 20 cents for half a gallon (not including water).
Hazards: NEVER MIX BLEACH AND AMMONIA TOGETHER! This combination is deadly!
Also, never mix products together that contain bleach with products that contain ammonia. This includes dishwasher detergent.